
Printing Fabric with Square Lino
Printing onto fabric is one of our specialties here at Handprinted. We like to come up with easy ways in which fabric can be printed in a small space at home with minimal mess and equipment. One such way we have been laying with recently is printing using a square piece of lino. From just a small block, a large number of designs can be made.
We have had a go at a diagonal block and a quarter-circle block to show you ways to print repeat patterns onto fabric!
Here’s how to create a design with a quarter circle:
Draw around your block onto a piece of paper. To create a circular design draw a curve joining opposite corners. Using a folder piece of paper to create an even curve might help here. This design uses several curves (each made with a piece of folder paper) filled with pattern. In the empty section outside of the curve, draw another smaller design radiating from the corner.

Transfer your design onto the block. You can use carbon paper or tracing paper.

Use a small V tool to carve around the edges of the design. A piece of anti-slip matting can help hold the lino in place whilst you carve, keeping your other hand safe away from the blade.
Use a large U tool to clear the unwanted areas of lino. Always clear the lino in a direction that flatters your design as some areas may be picked up by the ink and print. Around the edges of the circle I cleared in the direction of the curve.

Inside the circle I cleared in radiating lines from the corner.

On the back of your block, draw a curve that mimics how the print will look underneath. You can even number your edges 1, 2, 3 and 4 to help you place your block later.

Spoon out a little Fabric Screen Printing Ink onto an inking tray or glass slab. Use a sponge roller to roll out the ink.
We are using fabric screen printing ink as it keeps the handle of the fabric soft, dries quickly and is inexpensive to buy. A flat roller would slip around in this ink as it is much looser than block printing ink. A sponge roller ensures a more even coverage of ink – more info about using different inks for block printing coming up in our next project blog post!

Use the sponge roller (or better yet, a textile roller) to transfer the ink to the block. As it has more give, the sponge roller will put more ink down on the cleared sections of the lino, showing more of your carving lines. This does not necessarily mean that they will show in your print but using a mounted piece of lino will minimize the amount of extra lines that are printed. Textile rollers will give you less carving lines and absorb less ink, so you'll use up less ink.

Place your block face down onto your fabric with the curve as shown in the picture (number 1 should be at the top). Press down on the back of the block with the flat of your hand. Pinning your fabric onto a slightly padded surface helps to create an even print.

Re-ink up your block. Rotate it and place it so the curve creates a semi-circle (number 2 should be at the top). Print as before.

Place your next print following the clockwise direction of the circle.

Place your forth print to complete the circle.

Continue to print in this way, starting again in the top left corner.

Your blocks should match up to create a design from the outer corners too.

This is what our fabric looked like after 9 full circles were printed (36 prints).

You will need to set this ink with an iron once the prints have dried. This will make the fabric washable.
Try changing the configuration of your prints. This pattern staggers the circle to create semi circles in a wave.

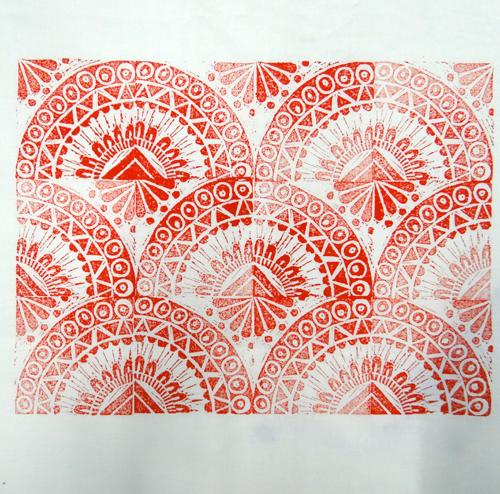
Here the semi circles all face the same direction but are staggered to create a design like overlapping scales.

This design was printed with the block diagonally, all facing the same direction.

This design matches up the curve to create a spiral (use the curve drawn on the back of your block to help you).

To have a go at this printing method you will need:
- Mounted square block of lino
- Carbon paper or tracing paper
- Pencil
- Lino Tools
- Inking tray
- Speedball Fabric Screen Printing Ink
- Sponge roller or Textile roller
- Fabric
- Slightly padded surface
- Iron