
Easy Christmas Cards Six Ways

We’ve had a lot of fun this week working on easy, quick and fun ways to print your own Christmas cards! We’ve come up with six simple ways for you to try. Take a look at our instructions below and have a go yourself.
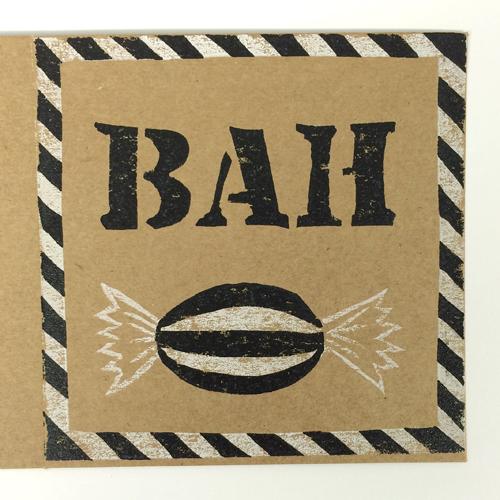
Bah Humbug Lino Printed Card
This two-layered lino card is quick, easy and so effective on these square kraft cards.


- Print or draw your design onto paper. Trace your design so that it is in reverse.
- Use a piece of Carbon Paper to transfer the design onto a piece of lino.
- Carve out the unwanted areas of the design with a lino tool.
- Ink up the lino using a roller. We used white for our first colour.
- Place a card on top and use a baren to rub all over the back to transfer the print.
- Lift off the card to reveal your first layer! Leave to dry. Print all of your cards with the first layer.
- Use the lino tool so remove any areas of the print that you wish to remain white. We carved in stripes on our humbug and on the border. We also removed the cellophane sweet ends so that they would remain white.
- Ink up the lino with your second colour. We used black.
- As before, place your card on top and transfer the print with a baren.
- Lift off the card to reveal your print! Print over the top of each of your first layer cards.
Drypoint Robin Christmas Card
This drypoint card can be traced from a photograph into a simple line drawing. A mono-printed red breast is made with a swipe of an inky thumb and will be slightly different on each card you print!
This method requires a press so feel free to pop into our studio to print yours!

- Use a piece of drypoint plastic slightly smaller than
the card you will be printing on. Tape
the plastic over the image and trace it using an etching needle. - Use a wadded up piece of fabric to daub etching ink all over your drawing. Use a piece of mount board to scrape off the excess.
- Wipe off the ink using a piece of scrim with a twisting action.
- Clean any remaining ink off the plate with a cloth. Be careful not to take too much ink out of the lines.
- Use your thumb to apply a smudge of red ink to the robin’s chest.
- Dampen your card with a sponge. Blot it with a j-cloth to remove excess water. It should feel slightly damp but not wet.
- Place the plate face up on the etching press. Place the card on top. Cover with the blankets and put through the press.
- Lift the card to reveal your print.
- Ink up the plate as before ready for your next card.
Mastercut Holly Christmas Card
This card is such a quick make and is so easy to print in large quantities with Versacraft ink pads. A pencil eraser is a resourceful and quick way to print the berries!


- Draw the leaf shapes onto a piece of Mastercut.
- Use a lino tool to carve around
the edges of each leaf. Carve in any detail such as the vein through the middle. - Cut around each leaf with a craft knife.
- Ink up the Mastercut using a Versacraft ink pad.
- Place the stamp face down on the card.
Press down all over with the flat of your hand. - Repeat with each of your stamps.
- Use the eraser end of a pencil to print red berries by dabbing it into a Versacraft ink pad.
- You can even try printing the envelope for an extra special touch!
Safeprint Bauble Christmas Card
This is a great option to print with children. Safeprint sheets of polystyrene are brilliant for quick printing. You need hardly any materials – the patterns are printed with the end of a biro! You’ll just need to cut out the shape for them as, to get neat edges, it needs to be done with a craft knife.


- Draw the shape onto a piece of safeprint with a pencil.
- Cut it out using a craft knife.
- Unscrew the end of a biro and use it to press circles into the safeprint.
- Use the end of the biro ink tube to press in smaller dots. Add detail using a sharp pencil.
- Roll out a thin layer of block printing ink onto a tray.
- Roll the ink onto the safeprint.
- Place the safeprint face down onto a card. use a dry roller to roll all over the back of the safeprint.
- Carefully lift off the safeprint to reveal your print!
Foiled Christmas Card
This is one of our favourite ways to make a card, and it certainly the quickest! You will need a black toner photocopy of your design. This can be from a carbon photocopier or toner printer. Inkjet will not work with this method.


- Place the foil shiny side up on the
carbon photocopy. - Place a sheet of grease-proof paper on top.
- Ion on a medium heat for about ten seconds. You will see when it is ready as the foil will stick.
- Peel off the excess foil to reveal your foiled design!
Screen Printed Snowflake Christmas Card
These cutout snowflakes make the perfect paper stencils for a screen printed card. Layered up with silver ink, these cards are so Christmassy, we couldn’t
stop printing them!


- To make a snowflake start with a small square of paper.
- Fold in half diagonally and then half again.
- Fold the left side towards the middle and then the right side over the left – the pictures will help if you’re confused at this point!
- Cut off the pointy tips to make a folder triangle.
- Cut shapes into the edges of your triangle and unfold to reveal your snowflake!
- Make a selection of these snowflakes to be layered up on your cards – we made so many – they’re so addictive!
- Place the card on a hard surface. If you’re using hinge clamps on your screen, use masking tape to mark where each card should be placed.
- Use parcel tape to mask tape all over your screen, leaving an opening the same size and shape as your card.
- Place your screen on top of the card and stencils and print with a squeegee and screen printing ink.
- Your stencils should stick to the screen ready for the next print.
- When the cards are dry, overlay more snowflakes on top and print with another colour. We printed with silver over our icy blue.
We hope you have given you some ideas for how to print your Christmas cards this year. Try one method, or try them all!