
Mono Screen Printing Using a Guide
Mono screen printing is a great technique if you want to create beautiful painterly prints but achieve the flatness of a screen print. It allows you to incorporate multiple colours in one layer and play with brush strokes and mark making.
When working with this technique, starting out with a blank area of mesh can be intimidating but we have found a way to combat this! By using a drawn guide underneath our screen we are able to take away that intimidation and produce a more precise print. This is also a great way of reproducing the same hand painted design for a varied print edition.
Follow along with this blog post to see how we achieve a more precise print using a drawn guide:

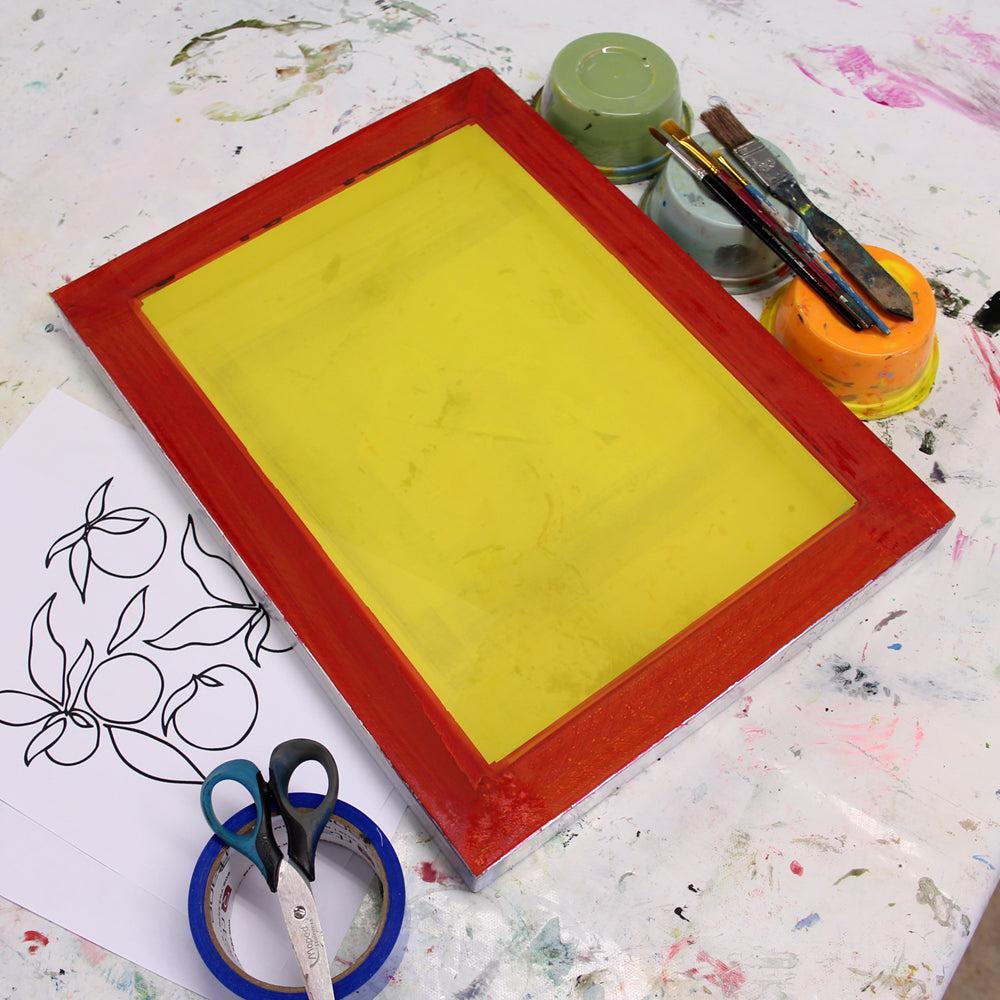
When mono screen printing we recommend using a screen with a custom exposed aperture or, like we are doing here, using blue block out tape to cover any open areas of mesh. The blue block out tape is extremely durable and can withstand multiple print runs and washing. As this tape is nice and strong we have only taped the underside of the screen but if you are using standard parcel tape to create your aperture we would recommend applying tape to both sides.

For this process you will want to use a hinged board. This will help you to print in the same place every time once you have registered your paper.

Using a guide with thick bold lines works best. Be aware that when you start painting onto your screen it will be slightly raised, making faint lines harder to see through the mesh.

Place your guide under your screen and position.

Prop your screen slightly away from your printing board using a pencil. This will ensure no ink comes through onto your guide.

You are now ready start painting your design. We recommend painting from light to dark. Drawn lines can also be added to your design using a soft pencil or graphite stick by drawing directly onto the mesh.

To achieve the best results all areas of open mesh need to be covered with ink. It is important to work quite quickly as the acrylic inks have a tendency to dry quite fast. You also want to make sure that you are applying a good amount of ink to your screen.

Once you have your main design painted, fill in any remaining areas with ink or medium. If you would like any areas to stay white then you can use white ink or clear printing medium. We would suggest putting this down first to avoid any colour contamination. If we were to leave the background empty with no ink the image would loose its definition and spread down the screen.

Lift your screen and place your paper down, using your registration marks for guidance.

When you are ready to print, apply a bead of clear printing medium along the top of your design. This will help to get your squeegee moving and produce a nice even print.

Take your print by placing your squeegee at the top of your design then pull towards yourself at a 45 degree angle. The excess ink will then sit on the screen until we are ready to remove it.

Lift your screen to reveal your print!


For this project you will need:
- Printed or Drawn Guide
- A4 90T Screen
- 225mm Squeegee
- Blue Block Out Tape or Exposed Aperture Screen
- Acrylic Screen Printing Ink (Acrylic Paint and Medium at a 50:50 ratio)
- Acrylic Medium
- Paint Brushes
- Inking Tray
- Spatula
- Pencil
- Paper to print onto - Kent or Snowdon